Achieve precise timekeeping with the AM1815AQ and PIC32MX470F512H
Ultra-low power real-time clock solution with SPI interface

Published Mar 21, 2025
Click board™
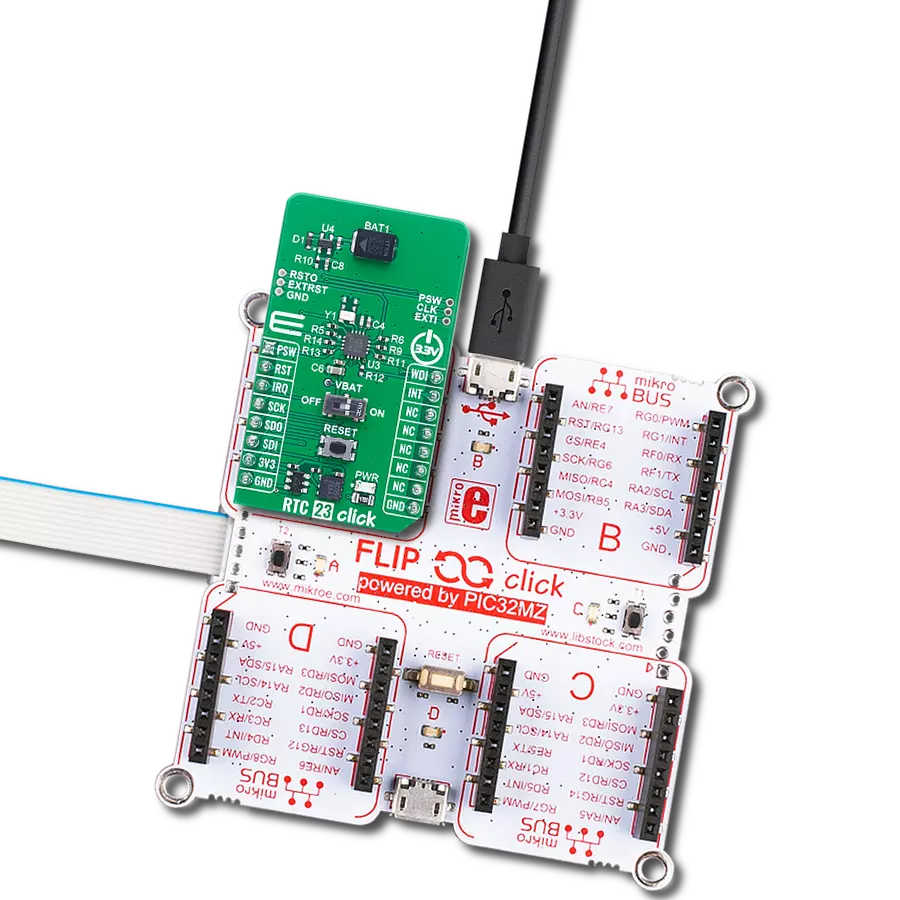
RTC 23 Click
Dev. board
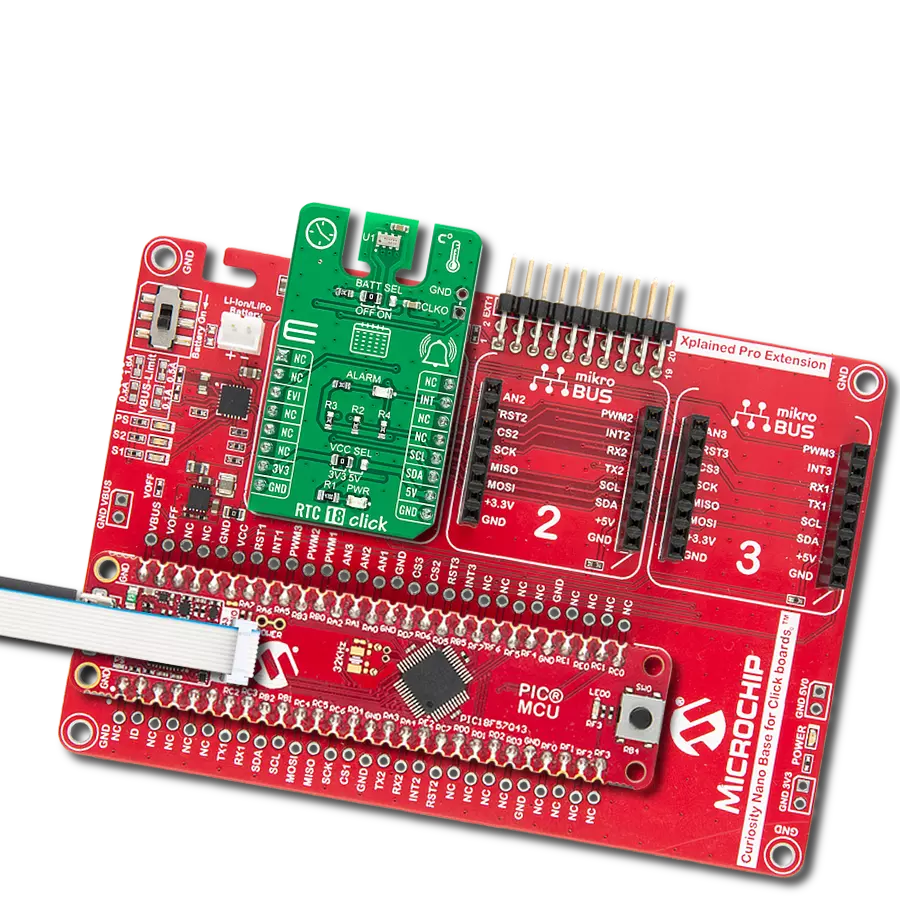
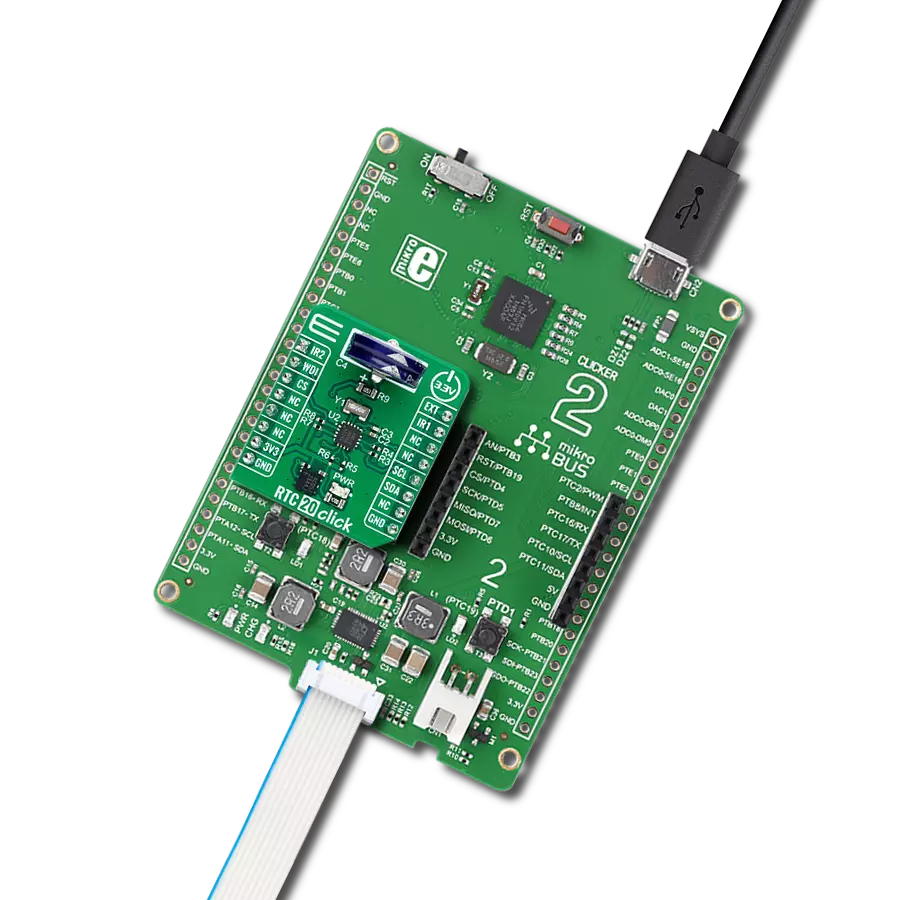
6LoWPAN clicker
Compiler
NECTO Studio
MCU
PIC32MX470F512H
Ensure accurate time tracking for applications requiring precise time management, such as data logging and task scheduling
A
A
Hardware Overview
How does it work?
RTC 23 Click is based on the AM1815AQ, an ultra-low-power real-time clock with integrated power management from Ambiq. Using Ambiq’s proprietary SPOT® (Subthreshold Power Optimized Technology) CMOS platform, this RTC sets a new industry standard with power consumption as low as 14nA, making it an ideal solution for power-sensitive applications. The AM1815AQ incorporates on-chip oscillators to ensure minimal power usage while providing full RTC functionality, including battery backup, programmable timers, counters, and alarms, along with an SPI interface for communication with a host MCU. Its integrated power switch and intelligent system sleep manager enable precise control over power states, allowing the RTC to be a supervisory component in MCU-based systems such as medical devices, utility meters, data loggers, household appliances, consumer electronics, and communication equipment. The AM1815AQ’s functionality is divided into baseline timekeeping, advanced timekeeping, and power management. Baseline timekeeping uses a 32.768kHz crystal oscillator, offering maximum frequency accuracy with an ultra-low current draw of just 55nA. Its digital calibration algorithm ensures frequency tuning accuracy down to 2ppm at specific temperatures. Advanced timekeeping introduces additional oscillation modes, including an RC oscillator and an auto-calibration mode, along with a finite state machine that manages host MCU transitions between active and low-power states. The integrated power switch, with an impedance of approximately 1Ω, can cut off ground current to the host MCU, reducing sleep current to below 1nA, making RTC 23 Click an essential component for any low-power embedded
system. RTC 23 Click is powered from the 3.3V mikroBUS™ power rail but also supports standalone operation, thanks to the PWY0150S micro-energy storage device from ITEN. This highly integrated, high-power-density battery delivers up to 20mA of current with a capacity of 150µAh in a compact SMD QFN package. Designed for high performance, it supports fast charging and can endure up to 1000 cycles at 100% depth of discharge (DoD). PWY0150S’s contribution to the design ensures reliable and efficient energy storage, enabling RTC 22 Click to maintain functionality even in low-power scenarios. The battery is recharged by the onboard XC6240 series charging IC for rechargeable batteries, providing a stable 2.7V charging voltage after battery depletion. Battery power can be enabled via the VBAT switch by toggling it from OFF to ON. Transitioning to standalone operation allows for significant power savings by cutting specific traces on the back of the board, which disables the lower part of the board below the RESET button, including the power indicator and ClickID circuitry. In this low-power mode, the timer interrupt signal can be used on the IRQ pin by connecting the right-side LP CUT trace on the back of the board, whereas in normal operation, this pin is reserved for ClickID communication. This Click board™ communicates with the host MCU via an SPI interface, supporting clock frequencies up to 2MHz to ensure fast and reliable data exchange. Alongside the standard SPI pins, the board includes an INT pin, an open-drain interrupt output, that signals when the RTC is ready to be accessed through the serial interface. Additionally, the WDI pin serves as a watchdog timer reset signal, safeguarding against system
failures by resetting the host MCU if it becomes unresponsive, thus ensuring continuous operation. This pin can also function as an external interrupt input, offering further flexibility for triggering specific events within the system. RTC 23 Click also features a group of unsoldered pins that provide additional functionality and flexibility. On the left side of the board, the RSTO pin serves as an open-drain reset output signal from the main AM1815AQ IC, used to reset the host MCU or other connected devices when triggered by internal RTC events, ensuring proper system initialization and recovery. Alongside it, the EXTRST pin functions as an external reset input, allowing the host MCU or external sources to reset the RTC itself when necessary. This same reset functionality is also accessible via the onboard RESET button, offering a manual alternative for triggering a system reset. On the right side, three unsoldered pins offer further capabilities: PSW acts as a power switch output for controlling external devices, turning their power supply ON or OFF; CLK provides a square-wave clock output that can serve as a precise timing reference for the host MCU or other peripherals; and EXTI functions as an external interrupt input, allowing external signals to trigger interrupts within the RTC, facilitating event-driven operations and synchronized timing in complex embedded systems. This Click board™ can be operated only with a 3.3V logic voltage level. The board must perform appropriate logic voltage level conversion before using MCUs with different logic levels. It also comes equipped with a library containing functions and example code that can be used as a reference for further development.

Features overview
Development board
6LoWPAN Clicker is a compact starter development board that brings the flexibility of add-on Click boards™ to your favorite microcontroller, making it a perfect starter kit for implementing your ideas. It comes with an onboard 32-bit PIC microcontroller, the PIC32MX470F512H from Microchip, a USB connector, LED indicators, buttons, a mikroProg connector, and a header for interfacing with external electronics. Along with this microcontroller, the board also contains a 2.4GHz ISM band transceiver, allowing you to add wireless communication to your target application. Its compact design provides a fluid and immersive working experience, allowing access anywhere
and under any circumstances. Each part of the 6LoWPAN Clicker development kit contains the components necessary for the most efficient operation of the same board. In addition to the possibility of choosing the 6LoWPAN Clicker programming method, using USB HID mikroBootloader, or through an external mikroProg connector for PIC, dsPIC, or PIC32 programmer, the Clicker board also includes a clean and regulated power supply module for the development kit. The USB Micro-B connection can provide up to 500mA of current for the Clicker board, which is more than enough to operate all onboard and additional modules, or it can power
over two standard AA batteries. All communication methods that mikroBUS™ itself supports are on this board, including the well-established mikroBUS™ socket, reset button, and several buttons and LED indicators. 6LoWPAN Clicker is an integral part of the Mikroe ecosystem, allowing you to create a new application in minutes. Natively supported by Mikroe software tools, it covers many aspects of prototyping thanks to a considerable number of different Click boards™ (over a thousand boards), the number of which is growing every day.

Microcontroller Overview
MCU Card / MCU

Architecture
PIC32
MCU Memory (KB)
512
Silicon Vendor
Microchip
Pin count
64
RAM (Bytes)
131072
Used MCU Pins
mikroBUS™ mapper
Take a closer look
Click board™ Schematic

Step by step
Project assembly

Start by selecting your development board and Click board™. Begin with the 6LoWPAN clicker as your development board.


Software Support
Library Description
RTC 23 Click demo application is developed using the NECTO Studio, ensuring compatibility with mikroSDK's open-source libraries and tools. Designed for plug-and-play implementation and testing, the demo is fully compatible with all development, starter, and mikromedia boards featuring a mikroBUS™ socket.
Example Description
This example demonstrates the use of RTC 23 Click by reading and displaying the time and date values.
Key functions:
rtc23_cfg_setup- Config Object Initialization function.rtc23_init- Initialization function.rtc23_set_time- This function sets the starting time values - second 100th, second, minute and hour.rtc23_read_time- This function reads the current time values - second 100th, second, minute and hour.rtc23_set_date- This function sets the starting date values - day of week, day, month and year.
Application Init
Initializes the driver, checks the communication, and sets the starting time and date.
Application Task
Reads and displays on the USB UART the current time and date values once per second.
Open Source
Code example
The complete application code and a ready-to-use project are available through the NECTO Studio Package Manager for direct installation in the NECTO Studio. The application code can also be found on the MIKROE GitHub account.
/*!
 * @file main.c
 * @brief RTC 23 Click example
 *
 * # Description
 * This example demonstrates the use of RTC 23 Click board by reading and displaying
 * the time and date values.
 *
 * The demo application is composed of two sections :
 *
 * ## Application Init
 * Initializes the driver, checks the communication, and sets the starting time and date.
 *
 * ## Application Task
 * Reads and displays on the USB UART the current time and date values once per second.
 *
 * @author Stefan Filipovic
 *
 */

#include "board.h"
#include "log.h"
#include "rtc23.h"

static rtc23_t rtc23;
static log_t logger;
static rtc23_time_t time;
static rtc23_date_t date;

/**
 * @brief RTC 23 get day of week name function.
 * @details This function returns the name of day of the week as a string.
 * @param[in] ctx : Click context object.
 * See #rtc23_t object definition for detailed explanation.
 * @param[in] day_of_week : Day of week decimal value.
 * @return Name of day as a string.
 * @note None.
 */
static uint8_t *rtc23_get_day_of_week_name ( uint8_t day_of_week );

void application_init ( void )
{
    log_cfg_t log_cfg;  /**< Logger config object. */
    rtc23_cfg_t rtc23_cfg;  /**< Click config object. */

    /**
     * Logger initialization.
     * Default baud rate: 115200
     * Default log level: LOG_LEVEL_DEBUG
     * @note If USB_UART_RX and USB_UART_TX
     * are defined as HAL_PIN_NC, you will
     * need to define them manually for log to work.
     * See @b LOG_MAP_USB_UART macro definition for detailed explanation.
     */
    LOG_MAP_USB_UART( log_cfg );
    log_init( &logger, &log_cfg );
    log_info( &logger, " Application Init " );

    // Click initialization.
    rtc23_cfg_setup( &rtc23_cfg );
    RTC23_MAP_MIKROBUS( rtc23_cfg, MIKROBUS_1 );
    if ( SPI_MASTER_ERROR == rtc23_init( &rtc23, &rtc23_cfg ) )
    {
        log_error( &logger, " Communication init." );
        for ( ; ; );
    }

    if ( RTC23_ERROR == rtc23_check_communication ( &rtc23 ) )
    {
        log_error( &logger, " Check communication." );
        for ( ; ; );
    }

    time.hour = 23;
    time.minute = 59;
    time.second = 50;
    time.second_100th = 0;
    if ( RTC23_OK == rtc23_set_time ( &rtc23, &time ) )
    {
        log_printf( &logger, " Set time: %.2u:%.2u:%.2u\r\n",
                    ( uint16_t ) time.hour, ( uint16_t ) time.minute, ( uint16_t ) time.second );
    }
    date.day_of_week = RTC23_TUESDAY;
    date.day = 31;
    date.month = 12;
    date.year = 24;
    if ( RTC23_OK == rtc23_set_date ( &rtc23, &date ) )
    {
        log_printf( &logger, " Set date: %s, %.2u.%.2u.20%.2u.\r\n",
                    rtc23_get_day_of_week_name ( date.day_of_week ),
                    ( uint16_t ) date.day, ( uint16_t ) date.month, ( uint16_t ) date.year );
    }
    Delay_ms ( 100 );
    log_info( &logger, " Application Task " );
}

void application_task ( void )
{
    if ( RTC23_OK == rtc23_read_time ( &rtc23, &time ) )
    {
        log_printf( &logger, " Time: %.2u:%.2u:%.2u\r\n",
                    ( uint16_t ) time.hour, ( uint16_t ) time.minute, ( uint16_t ) time.second );
    }
    if ( RTC23_OK == rtc23_read_date ( &rtc23, &date ) )
    {
        log_printf( &logger, " Date: %s, %.2u.%.2u.20%.2u.\r\n",
                    rtc23_get_day_of_week_name ( date.day_of_week ),
                    ( uint16_t ) date.day, ( uint16_t ) date.month, ( uint16_t ) date.year );
    }
    Delay_ms ( 1000 );
}

int main ( void )
{
    /* Do not remove this line or clock might not be set correctly. */
    #ifdef PREINIT_SUPPORTED
    preinit();
    #endif

    application_init( );

    for ( ; ; )
    {
        application_task( );
    }

    return 0;
}

static uint8_t *rtc23_get_day_of_week_name ( uint8_t day_of_week )
{
    switch ( day_of_week )
    {
        case RTC23_MONDAY:
        {
            return "Monday";
        }
        case RTC23_TUESDAY:
        {
            return "Tuesday";
        }
        case RTC23_WEDNESDAY:
        {
            return "Wednesday";
        }
        case RTC23_THURSDAY:
        {
            return "Thursday";
        }
        case RTC23_FRIDAY:
        {
            return "Friday";
        }
        case RTC23_SATURDAY:
        {
            return "Saturday";
        }
        case RTC23_SUNDAY:
        {
            return "Sunday";
        }
        default:
        {
            return "Unknown";
        }
    }
}

// ------------------------------------------------------------------------ END
Additional Support
Resources
Category:RTC